When we disco 三渲二

介绍了将 When we disco 三渲二的历程主要步骤与相关问题,成功的有 AnimeGANv3DCT-Net。文章全文偏长,没用的失败经历居多;如时间紧迫,只看上述成功的两节即可。

动机

在B站上看到别人把衿儿和粒粒跳的和嘉然和向晚跳的 When we disco 舞混剪,并冠以“三渲二”的名头。又发现 B 站上还没有衿使用 GAN 生成动画化衿儿和粒粒跳舞视频的实例,只在贴吧上看到过有画师将他们跳的舞画下来,而且画得还挺好看。想借助 GAN 动画化视频并投稿至 B 站的念头由此萌生。

paint_cover

使用 Deep Dream Generator (失败)

通过百度得知deepdreamgenerator是一个知名的风格迁移网站,可以轻松地对某一张照片进行操作,于是我注册了一个 deepdream 账户。进入网页后很快发现了两个问题:

  1. 服务器架设在国外,国内访问速度慢。
  2. 网页上的模型只支持单张照片而不支持一整个视频。

使用 AnimeGANv2 (失败)

我拿到这个问题后最先想到的其实就是PaddlePaddle,因为之前在PaddlePaddle上做过类似的项目,一整个体验非常不错。于是果不其然我找到了PaddleHub一键视频动漫化这个项目。

paddle 代码


0、BUG

在生成新版本时候,空文件夹无法加入,即使加入成功后,别人fork也无法显示。望修复,谢谢:)

1
!mkdir -p work/mp4_img work/mp4_img3 work/output

1、安装PaddleHub

1
!pip install paddlehub -U -i https://pypi.tuna.tsinghua.edu.cn/simple #用了清华的镜像源

Looking in indexes: https://pypi.tuna.tsinghua.edu.cn/simple
Requirement already satisfied: paddlehub in /opt/conda/envs/python35-paddle120-env/lib/python3.7/site-packages (2.2.0)

(为节省版面删去刷屏部分)

2、设置GPU环境

1
2
%env CUDA_VISIBLE_DEVICES=0
%matplotlib inline

env: CUDA_VISIBLE_DEVICES=0

3、导入相应的库

1
2
3
import cv2
import paddlehub as hub
import os

4、选择视频及模板

Tips:可在此处更改风格哦

这里可以更换很多风格,想了解更多风格,请点击此处

1
2
3
# input_video = 'test.mp4'
input_video = 'test2.flv'
model = hub.Module(name='animegan_v2_shinkai_33', use_gpu=True) #这里用的是animegan_v2_shinkai_33(新海诚动漫风格)
1
2
3
[2022-08-12 16:53:29,855] [ WARNING] - The _initialize method in HubModule will soon be deprecated, you can use the __init__() to handle the initialization of the object
E0812 16:53:29.861804 1550 analysis_config.cc:80] Please compile with gpu to EnableGpu()
W0812 16:53:29.861893 1550 analysis_predictor.cc:1145] Deprecated. Please use CreatePredictor instead.

5、将视频转化为图片

Tips:可以用ls work/mp4_img | wc -w命令到终端看一下完成的图片数量

1
2
3
4
5
6
7
8
9
10
11
12
13
14
15
16
17
def transform_video_to_image(video_file_path, img_path):
'''
将视频中每一帧保存成图片
'''
video_capture = cv2.VideoCapture(video_file_path)
fps = video_capture.get(cv2.CAP_PROP_FPS)
count = 0
while(True):
ret, frame = video_capture.read()
if ret:
cv2.imwrite(img_path + '%d.jpg' % count, frame)
count += 1
else:
break
video_capture.release()
print('视频图片保存成功, 共有 %d 张' % count)
return fps,count
1
2
3
# 将视频中每一帧保存成图片
# fps,count = transform_video_to_image(input_video, 'work/mp4_img/')
count = 6832

6、将图片转换风格

备注:运行时间可能会很久哦

Tips:可以用ls work/mp4_img3 | wc -w命令到终端看一下完成的图片数量

1
2
3
4
5
6
7
8
9
10
11
12
13
14
15
16
17
18
def get_combine_img(input_file_patha):
#Pathname=""
output_file_path="work/mp4_img3/"
input_file_path="work/mp4_img/"+input_file_patha
#print(input_file_path)
#print(output_file_path)
model.style_transfer(images=[cv2.imread(input_file_path)],visualization=True,output_dir=output_file_path)
# result = model.style_transfer(images=[cv2.imread(input_file_path)],visualization=True,output_dir=output_file_path)
# for root, dirs, files in os.walk(output_file_path):
# fils=files
# files=''.join(files)
# #print(files)
# dict1="mv "+output_file_path+files+" "+output_file_path+input_file_patha
# os.system(dict1)
# dict1="cp "+output_file_path+input_file_patha+" "+"./work/mp4_img3/"+input_file_patha
# #print(dict1)
# os.system(dict1)
# os.system("rm -rf ./work/mp4_img2")
1
2
3
4
5
6
7
# def transform():
# os.system("mkdir ./work/mp4_img3")
# for i in range(0,count):
# name=str(i)+".jpg"
# print(name)
# get_combine_img(name)
# print('视频图片转换成功, 共有 %d 张' % (i+1))
1
2
3
4
5
6
7
8
9
10
def transform():
for i in range(0,count):
input_file_path = "work/mp4_img/" + str(i)+".jpg"
output_file_path = "work/mp4_img3/" + str(i)+".jpg"
print(input_file_path)
results = model.style_transfer(images=[cv2.imread(input_file_path)], output_dir=output_file_path)
print(output_file_path)
print('视频图片转换成功, 共有 %d 张' % (i+1))
# get_combine_img(name)

1
transform()

work/mp4_img/0.jpg

7、将图片合成为视频

1
2
3
4
5
6
7
8
9
10
11
12
13
14
15
16
17
18
19
20
21
22
def combine_image_to_video(comb_path, output_file_path, fps, is_print=False):
'''
合并图像到视频
'''
fourcc = cv2.VideoWriter_fourcc(*'MP4V')

file_items = os.listdir(comb_path)
file_len = len(file_items)
# print(comb_path, file_items)
if file_len > 0 :
temp_img = cv2.imread(os.path.join(comb_path, file_items[0]))
img_height, img_width = temp_img.shape[0], temp_img.shape[1]

out = cv2.VideoWriter(output_file_path, fourcc, fps, (img_width, img_height))

for i in range(file_len):
pic_name = os.path.join(comb_path, str(i)+".jpg")
if is_print:
print(i+1,'/', file_len, ' ', pic_name)
img = cv2.imread(pic_name)
out.write(img)
out.release()
1
2
3
import time
final_name="work/output/"+time.strftime("%Y%m%d%H%M%S", time.localtime())+".mp4"
tran_name="! ffmpeg -i work/mp4_analysis.mp4 -i work/video.mp3 -c copy "+final_name
1
combine_image_to_video('work/mp4_img3/', 'work/mp4_analysis.mp4' ,fps)

8、添加原有音频

1
2
3
! ffmpeg -i test.mp4 -vn work/video.mp3
os.system(tran_name)
#! ffmpeg -i work/mp4_analysis.mp4 -i work/video.mp3 -c copy output/mp4_analysis_result.mp4

10、清除临时数据

1
2
3
4
! rm -rf ./work/mp4_img/*
! rm -rf ./work/mp4_img3/*
! rm -rf ./work/video.mp3
! rm -rf ./work/mp4_analysis.mp4

关于作者

😃姓名:曾焯淇😃

😃学历:高中😃

😃From:广东 佛山(欢迎面基)😃

我在AI Studio上获得黄金等级,点亮3个徽章,来互关呀~ https://aistudio.baidu.com/aistudio/personalcenter/thirdview/233221


问题

如果上述代码可以运行成功,恐怕这篇博客就不会这么长了——可惜它不能。每次运行到转换部分时,系统就会卡死,然后提示 kernel 自动重启,具体地说无法执行下述代码:

1
model.style_transfer(images=[cv2.imread(input_file_path)],visualization=True,output_dir=output_file_path)

首先排除代码问题。因为官方给的例子是这样的:

1
2
3
4
5
6
7
8
9
10
11
# 转换为新海诚《你的名字》、《天气之子》风格图片

import cv2
import paddlehub as hub

# 模型加载
# use_gpu:是否使用GPU进行预测
model = hub.Module(name='animegan_v2_shinkai_33', use_gpu=True)

# 模型预测
result = model.style_transfer(images=[cv2.imread('./test.jpg')],visualization=True)

这个例子已经无法运行了:

1
2
[2022-08-12 17:11:15,815] [ WARNING] - The _initialize method in HubModule will soon be deprecated, you can use the __init__() to handle the initialization of the object
---------------------------------------------------------------------------ValueError Traceback (most recent call last)/tmp/ipykernel_93/2846720433.py in <module> 10 11 # 模型预测 ---> 12 result = model.style_transfer(images=[cv2.imread('./test.jpg')],visualization=True) /opt/conda/envs/python35-paddle120-env/lib/python3.7/site-packages/paddlehub/compat/paddle_utils.py in runner(*args, **kwargs) 218 def runner(*args, **kwargs): 219 with static_mode_guard(): --> 220 return func(*args, **kwargs) 221 222 return runner ~/.paddlehub/modules/animegan_v1_hayao_60/module.py in style_transfer(self, images, paths, output_dir, visualization, min_size, max_size) 44 45 # 模型预测 ---> 46 outputs = self.model.predict(processor.input_datas) 47 48 # 结果后处理 ~/.paddlehub/modules/animegan_v1_hayao_60/model.py in predict(self, input_datas) 56 for input_data in input_datas: 57 self.input_tensor.copy_from_cpu(input_data) ---> 58 self.predictor.zero_copy_run() 59 output = self.output_tensor.copy_to_cpu() 60 outputs.append(output) ValueError: In user code: File "c:\users\xpk22\appdata\local\programs\python\python37\lib\site-packages\paddle\fluid\framework.py", line 2610, in append_op attrs=kwargs.get("attrs", None)) File "c:\users\xpk22\appdata\local\programs\python\python37\lib\site-packages\paddle\fluid\layer_helper.py", line 43, in append_op return self.main_program.current_block().append_op(*args, **kwargs) File "c:\users\xpk22\appdata\local\programs\python\python37\lib\site-packages\paddle\fluid\layers\nn.py", line 2938, in conv2d "data_format": data_format, File "Hayao-60\model_with_code\x2paddle_model.py", line 138, in x2paddle_net generator_G_MODEL_b1_Conv_Conv2D = fluid.layers.conv2d(input=conv2d_transpose_0, bias_attr=False, param_attr='generator_G_MODEL_b1_Conv_weights', num_filters=64, filter_size=[3, 3], stride=[1, 1], dilation=[1, 1], padding='VALID') File "c:\users\xpk22\appdata\local\programs\python\python37\lib\site-packages\x2paddle\core\program.py", line 290, in gen_model inputs, outputs = x2paddle_model.x2paddle_net() File "c:\users\xpk22\appdata\local\programs\python\python37\lib\site-packages\x2paddle\convert.py", line 137, in tf2paddle program.gen_model(save_dir) File "c:\users\xpk22\appdata\local\programs\python\python37\lib\site-packages\x2paddle\convert.py", line 291, in main define_input_shape, params_merge) File "C:\Users\Xpk22\AppData\Local\Programs\Python\Python37\Scripts\x2paddle.exe\__main__.py", line 7, in <module> sys.exit(main()) File "c:\users\xpk22\appdata\local\programs\python\python37\lib\runpy.py", line 85, in _run_code exec(code, run_globals) File "c:\users\xpk22\appdata\local\programs\python\python37\lib\runpy.py", line 193, in _run_module_as_main "__main__", mod_spec) InvalidArgumentError: The number of input's channels should be equal to filter's channels * groups for Op(Conv). But received: the input's channels is 674, the input's shape is [1, 674, 1026, 3]; the filter's channels is 3, the filter's shape is [64, 3, 3, 3]; the groups is 1, the data_format is NCHW. The error may come from wrong data_format setting. [Hint: Expected input_channels == filter_dims[1] * groups, but received input_channels:674 != filter_dims[1] * groups:3.] (at /paddle/paddle/fluid/operators/conv_op.cc:116) [operator < conv2d > error]

所以我猜测原因可能会是以下几点中的一点或多点:

  • Paddle框架存在不同版本间的兼容问题
  • AI Studio 基础版运行环境给的内存太小
  • AI Studio 基础版给的CPU太慢

所以此次尝试是失败的。不过注意到它使用的模型是AnimeGANv2,这倒启发我去github上找答案。于是,三下三下五除二找到了AnimeGANv2,于是有了后文。

使用 Github 上的开源项目 (失败)

animegan2-pytorch

在执行

1
2
3
4
5
6
7
8
9
10
11
12
13
14
15
16
17
18
19
20
21
22
23
24
25
26
27
28
29
30
31
32
33
34
35
36
37
38
39
40
41
42
43
44
45
46
47
48
49
50
51
52
53
54
55
56
57
58
59
60
61
62
63
64
65
66
67
68
69
70
71
72
73
74
75
76
77
78
79
80
81
82
83
84
85
86
87
88
89
90
91
92
93
94
95
96
97
98
99
100
101
102
103
104
105
106
107
108
109
110
111
112
113
114
115
116
117
118
119
120
121
122
123
124
125
126
127
128
129
130
131
132
133
134
135
136
137
138
139
140
141
142
143
144
145
146
147
148
149
150
151
152
153
154
155
156
157
158
159
160
161
162
#@title Face Detector & FFHQ-style Alignment

# https://github.com/woctezuma/stylegan2-projecting-images

import os
import dlib
import collections
from typing import Union, List
import numpy as np
from PIL import Image
import matplotlib.pyplot as plt


def get_dlib_face_detector(predictor_path: str = "shape_predictor_68_face_landmarks.dat"):

if not os.path.isfile(predictor_path):
model_file = "shape_predictor_68_face_landmarks.dat.bz2"
os.system(f"wget http://dlib.net/files/{model_file}")
os.system(f"bzip2 -dk {model_file}")

detector = dlib.get_frontal_face_detector()
shape_predictor = dlib.shape_predictor(predictor_path)

def detect_face_landmarks(img: Union[Image.Image, np.ndarray]):
if isinstance(img, Image.Image):
img = np.array(img)
faces = []
dets = detector(img)
for d in dets:
shape = shape_predictor(img, d)
faces.append(np.array([[v.x, v.y] for v in shape.parts()]))
return faces

return detect_face_landmarks


def display_facial_landmarks(
img: Image,
landmarks: List[np.ndarray],
fig_size=[15, 15]
):
plot_style = dict(
marker='o',
markersize=4,
linestyle='-',
lw=2
)
pred_type = collections.namedtuple('prediction_type', ['slice', 'color'])
pred_types = {
'face': pred_type(slice(0, 17), (0.682, 0.780, 0.909, 0.5)),
'eyebrow1': pred_type(slice(17, 22), (1.0, 0.498, 0.055, 0.4)),
'eyebrow2': pred_type(slice(22, 27), (1.0, 0.498, 0.055, 0.4)),
'nose': pred_type(slice(27, 31), (0.345, 0.239, 0.443, 0.4)),
'nostril': pred_type(slice(31, 36), (0.345, 0.239, 0.443, 0.4)),
'eye1': pred_type(slice(36, 42), (0.596, 0.875, 0.541, 0.3)),
'eye2': pred_type(slice(42, 48), (0.596, 0.875, 0.541, 0.3)),
'lips': pred_type(slice(48, 60), (0.596, 0.875, 0.541, 0.3)),
'teeth': pred_type(slice(60, 68), (0.596, 0.875, 0.541, 0.4))
}

fig = plt.figure(figsize=fig_size)
ax = fig.add_subplot(1, 1, 1)
ax.imshow(img)
ax.axis('off')

for face in landmarks:
for pred_type in pred_types.values():
ax.plot(
face[pred_type.slice, 0],
face[pred_type.slice, 1],
color=pred_type.color, **plot_style
)
plt.show()


# https://github.com/NVlabs/ffhq-dataset/blob/master/download_ffhq.py

import PIL.Image
import PIL.ImageFile
import numpy as np
import scipy.ndimage


def align_and_crop_face(
img: Image.Image,
landmarks: np.ndarray,
expand: float = 1.0,
output_size: int = 1024,
transform_size: int = 4096,
enable_padding: bool = True,
):
# Parse landmarks.
# pylint: disable=unused-variable
lm = landmarks
lm_chin = lm[0 : 17] # left-right
lm_eyebrow_left = lm[17 : 22] # left-right
lm_eyebrow_right = lm[22 : 27] # left-right
lm_nose = lm[27 : 31] # top-down
lm_nostrils = lm[31 : 36] # top-down
lm_eye_left = lm[36 : 42] # left-clockwise
lm_eye_right = lm[42 : 48] # left-clockwise
lm_mouth_outer = lm[48 : 60] # left-clockwise
lm_mouth_inner = lm[60 : 68] # left-clockwise

# Calculate auxiliary vectors.
eye_left = np.mean(lm_eye_left, axis=0)
eye_right = np.mean(lm_eye_right, axis=0)
eye_avg = (eye_left + eye_right) * 0.5
eye_to_eye = eye_right - eye_left
mouth_left = lm_mouth_outer[0]
mouth_right = lm_mouth_outer[6]
mouth_avg = (mouth_left + mouth_right) * 0.5
eye_to_mouth = mouth_avg - eye_avg

# Choose oriented crop rectangle.
x = eye_to_eye - np.flipud(eye_to_mouth) * [-1, 1]
x /= np.hypot(*x)
x *= max(np.hypot(*eye_to_eye) * 2.0, np.hypot(*eye_to_mouth) * 1.8)
x *= expand
y = np.flipud(x) * [-1, 1]
c = eye_avg + eye_to_mouth * 0.1
quad = np.stack([c - x - y, c - x + y, c + x + y, c + x - y])
qsize = np.hypot(*x) * 2

# Shrink.
shrink = int(np.floor(qsize / output_size * 0.5))
if shrink > 1:
rsize = (int(np.rint(float(img.size[0]) / shrink)), int(np.rint(float(img.size[1]) / shrink)))
img = img.resize(rsize, PIL.Image.ANTIALIAS)
quad /= shrink
qsize /= shrink

# Crop.
border = max(int(np.rint(qsize * 0.1)), 3)
crop = (int(np.floor(min(quad[:,0]))), int(np.floor(min(quad[:,1]))), int(np.ceil(max(quad[:,0]))), int(np.ceil(max(quad[:,1]))))
crop = (max(crop[0] - border, 0), max(crop[1] - border, 0), min(crop[2] + border, img.size[0]), min(crop[3] + border, img.size[1]))
if crop[2] - crop[0] < img.size[0] or crop[3] - crop[1] < img.size[1]:
img = img.crop(crop)
quad -= crop[0:2]

# Pad.
pad = (int(np.floor(min(quad[:,0]))), int(np.floor(min(quad[:,1]))), int(np.ceil(max(quad[:,0]))), int(np.ceil(max(quad[:,1]))))
pad = (max(-pad[0] + border, 0), max(-pad[1] + border, 0), max(pad[2] - img.size[0] + border, 0), max(pad[3] - img.size[1] + border, 0))
if enable_padding and max(pad) > border - 4:
pad = np.maximum(pad, int(np.rint(qsize * 0.3)))
img = np.pad(np.float32(img), ((pad[1], pad[3]), (pad[0], pad[2]), (0, 0)), 'reflect')
h, w, _ = img.shape
y, x, _ = np.ogrid[:h, :w, :1]
mask = np.maximum(1.0 - np.minimum(np.float32(x) / pad[0], np.float32(w-1-x) / pad[2]), 1.0 - np.minimum(np.float32(y) / pad[1], np.float32(h-1-y) / pad[3]))
blur = qsize * 0.02
img += (scipy.ndimage.gaussian_filter(img, [blur, blur, 0]) - img) * np.clip(mask * 3.0 + 1.0, 0.0, 1.0)
img += (np.median(img, axis=(0,1)) - img) * np.clip(mask, 0.0, 1.0)
img = PIL.Image.fromarray(np.uint8(np.clip(np.rint(img), 0, 255)), 'RGB')
quad += pad[:2]

# Transform.
img = img.transform((transform_size, transform_size), PIL.Image.QUAD, (quad + 0.5).flatten(), PIL.Image.BILINEAR)
if output_size < transform_size:
img = img.resize((output_size, output_size), PIL.Image.ANTIALIAS)

return img

中,报

1
2
3
4
5
6
7
8
9
10
---------------------------------------------------------------------------
ModuleNotFoundError Traceback (most recent call last)
/tmp/ipykernel_144/2320490344.py in <module>
4
5 import os
----> 6 import dlib
7 import collections
8 from typing import Union, List

ModuleNotFoundError: No module named 'dlib'

于是

1
pip install dlib

1
2
3
4
5
6
7
8
9
10
11
12
13
14
15
16
17
18
19
20
21
22
23
24
25
26
27
28
29
30
31
32
33
34
35
36
37
38
39
40
41
42
43
44
45
46
47
48
49
50
51
52
53
54
Collecting dlib
Using cached dlib-19.24.0.tar.gz (3.2 MB)
Preparing metadata (setup.py) ... done
Building wheels for collected packages: dlib
Building wheel for dlib (setup.py) ... error
error: subprocess-exited-with-error

× python setup.py bdist_wheel did not run successfully.
│ exit code: 1
╰─> [8 lines of output]
running bdist_wheel
running build
running build_py
package init file 'tools/python/dlib/__init__.py' not found (or not a regular file)
running build_ext

ERROR: CMake must be installed to build dlib

[end of output]

note: This error originates from a subprocess, and is likely not a problem with pip.
ERROR: Failed building wheel for dlib
Running setup.py clean for dlib
Failed to build dlib
Installing collected packages: dlib
Running setup.py install for dlib ... error
error: subprocess-exited-with-error

× Running setup.py install for dlib did not run successfully.
│ exit code: 1
╰─> [10 lines of output]
running install
/home/studio-lab-user/.conda/envs/default/lib/python3.9/site-packages/setuptools/command/install.py:34: SetuptoolsDeprecationWarning: setup.py install is deprecated. Use build and pip and other standards-based tools.
warnings.warn(
running build
running build_py
package init file 'tools/python/dlib/__init__.py' not found (or not a regular file)
running build_ext

ERROR: CMake must be installed to build dlib

[end of output]

note: This error originates from a subprocess, and is likely not a problem with pip.
error: legacy-install-failure

× Encountered error while trying to install package.
╰─> dlib

note: This is an issue with the package mentioned above, not pip.
hint: See above for output from the failure.

[notice] A new release of pip available: 22.1.2 -> 22.2.2
[notice] To update, run: pip install --upgrade pip

于是我放弃了

Fast Style Transfer in TensorFlow

项目ReadMe中写得真好:

1
2
3
4
5
6
7
8
9
10
11
12
13
14
15
16
17
### Stylizing Video
Use `transform_video.py` to transfer style into a video. Run `python transform_video.py` to view all the possible parameters. Requires `ffmpeg`. [More detailed documentation here](docs.md#transform_videopy). Example usage:

python transform_video.py --in-path path/to/input/vid.mp4 \
--checkpoint path/to/style/model.ckpt \
--out-path out/video.mp4 \
--device /gpu:0 \
--batch-size 4

### Requirements
You will need the following to run the above:
- TensorFlow 0.11.0
- Python 2.7.9, Pillow 3.4.2, scipy 0.18.1, numpy 1.11.2
- If you want to train (and don't want to wait for 4 months):
- A decent GPU
- All the required NVIDIA software to run TF on a GPU (cuda, etc)
- ffmpeg 3.1.3 if you want to stylize video

细看:RequirementsTensorFlow 0.11.0太老了吧,算了算了;还有“Models for evaluation are located here”里面存放模型的链接打不开。

CCPL

项目ReadMe

1
2
3
### Pre-trained Models

To use the pre-trained models, please download here [pre-trained models](https://drive.google.com/drive/folders/1XxhpzFqCVvboIyXKLfb2ocJZabPYu3pi?usp=sharing) and specify them during training (These pre-trained models are trained under pytorch-1.9.1 and torchvision-0.10.1)

pre-trained models 无法下载。

使用 AnimeGANv3

在AnimeGANv2项目主页中,发现了AnimeGANv3。AnimeGANv3是一个尚在研发之中的项目,根据其主页介绍可以发现它尚未开源,仅提供了几个.exe程序来制作 Demo。下面将利用这个项目制作视频。

步骤

  1. 下载原视频

    1
    2
    dotnet tool install --global BBDown
    BBDown -tv https://www.bilibili.com/video/BV1SB4y1y7GQ
  2. 下载AnimeGANv3项目。该项目内不直接提供源代码,但提供使用pyinstaller打包而成的可以直接进行图片与视频风格迁移的.exe程序

    1
    git clone https://github.com/TachibanaYoshino/AnimeGANv3.git
  3. 开始风格迁移。按软件界面提示操作,依次选择Vedio2Animevideomodel,等待亿下,直至转换完成即可。

    1
    ./AnimeGANv3/AnimeGANv3.exe

软件GUI
软件CLI

存在的问题

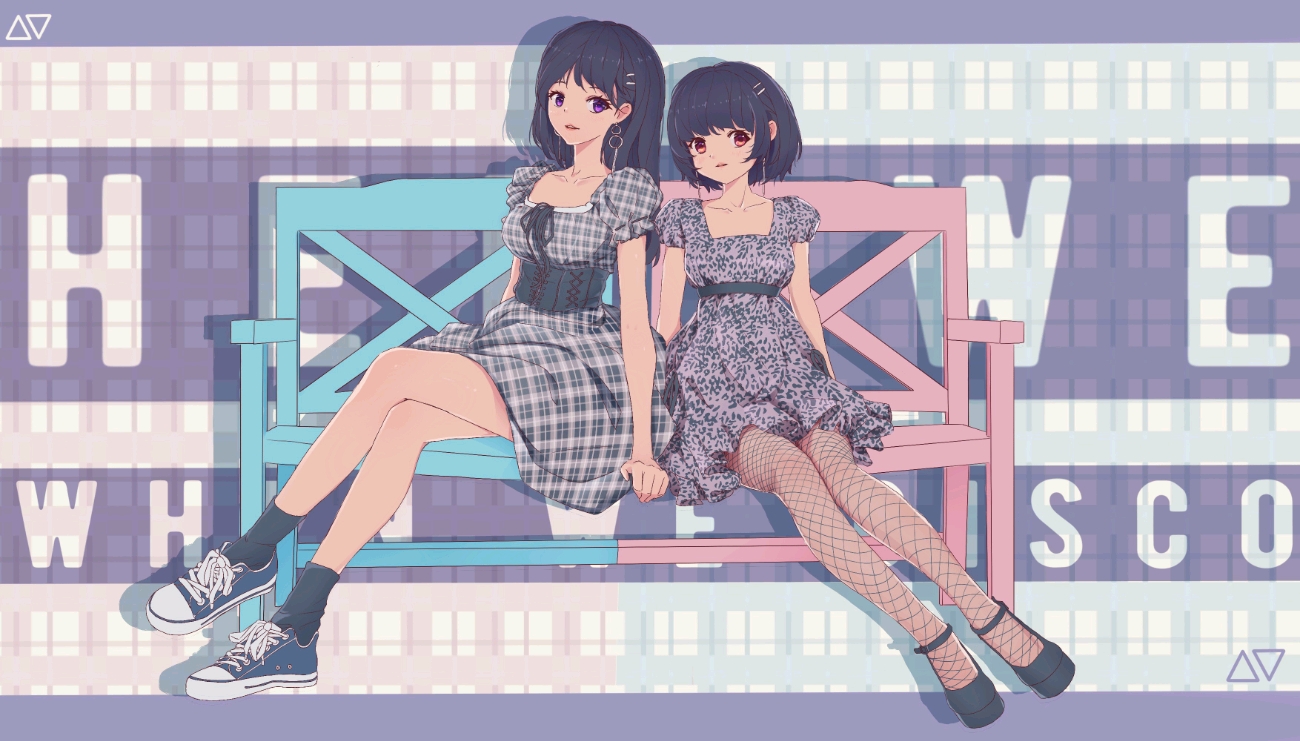
首先是转换之后的风格。以封面为例我们来看看问题所在:

  • 原封面:
    cover
  • 转换后的封面:
    animeganV3-cover

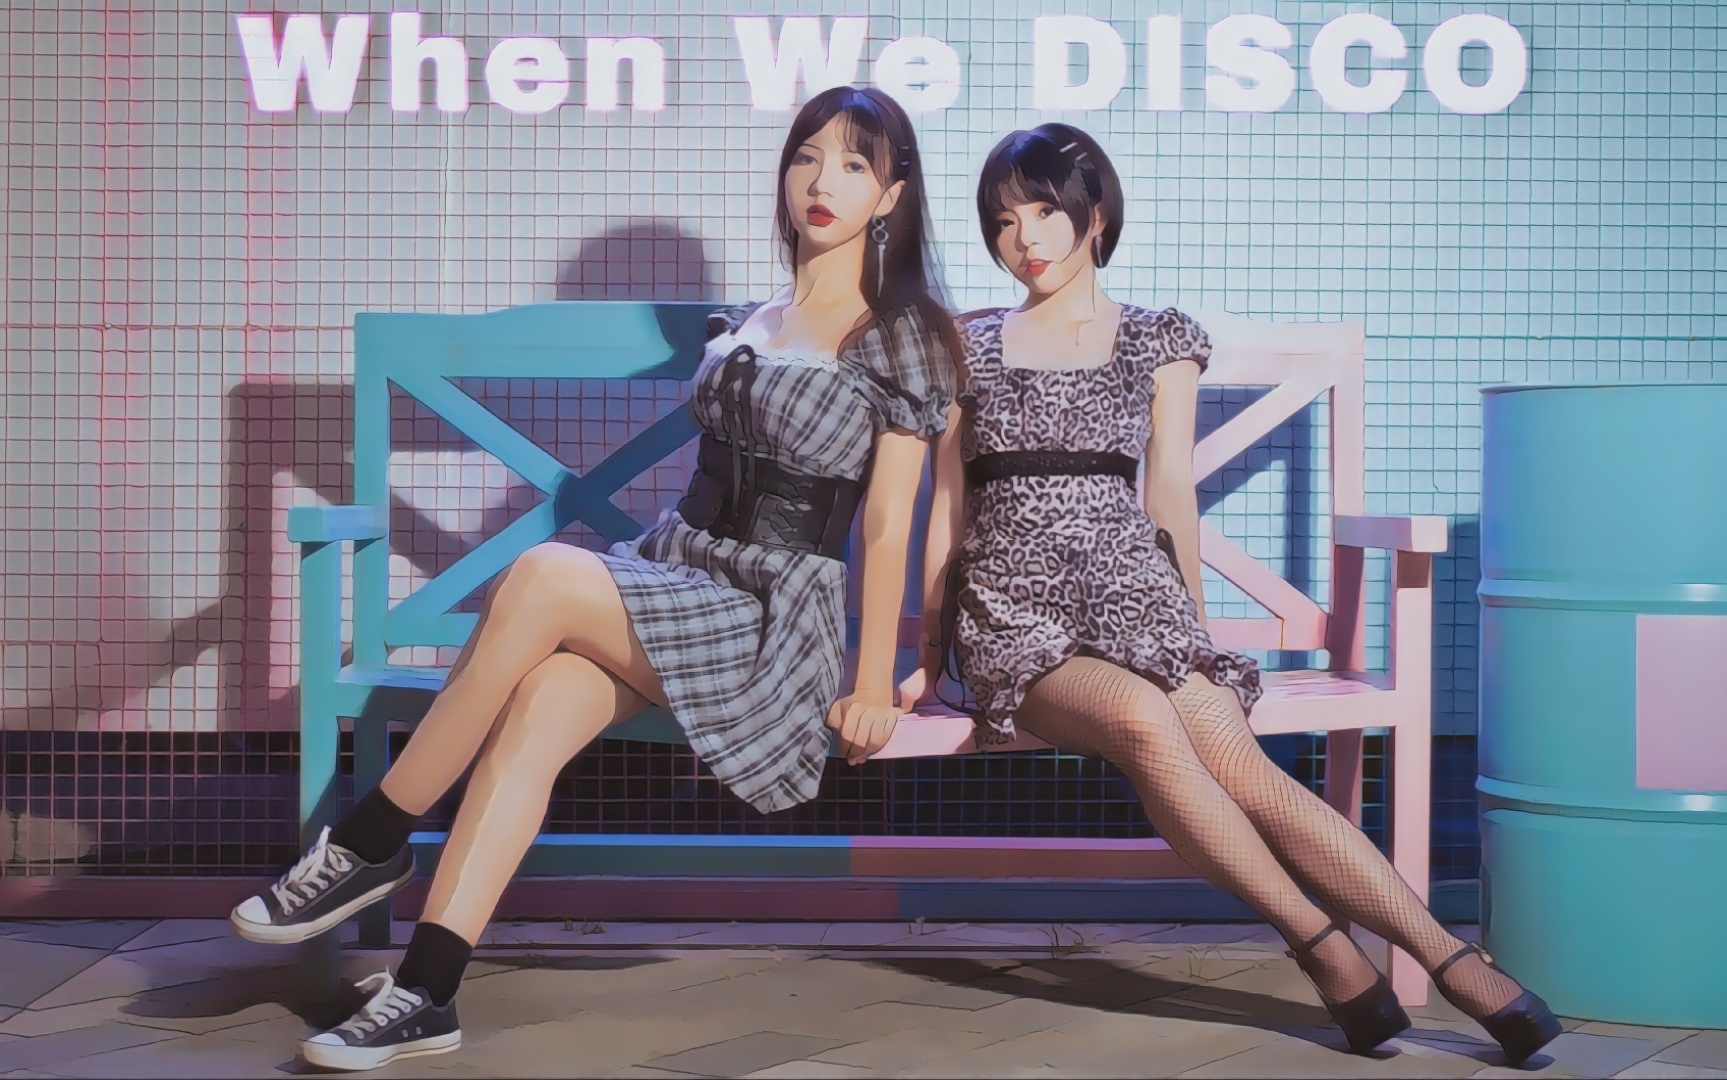
我们发现,图片右下角衿儿的嗨丝就像没有被GAN处理过一样。更糟糕的是,在 B 站压缩封面画质、移动端缩小展示大小后,生成的图片已实际与原图差别不大。同样的问题不止发生在封面,而是贯穿整个视频。作为比较,我们还将较早前animegan模型拿出来进行生成,缺陷部分未见明显改善。
animegan-cover
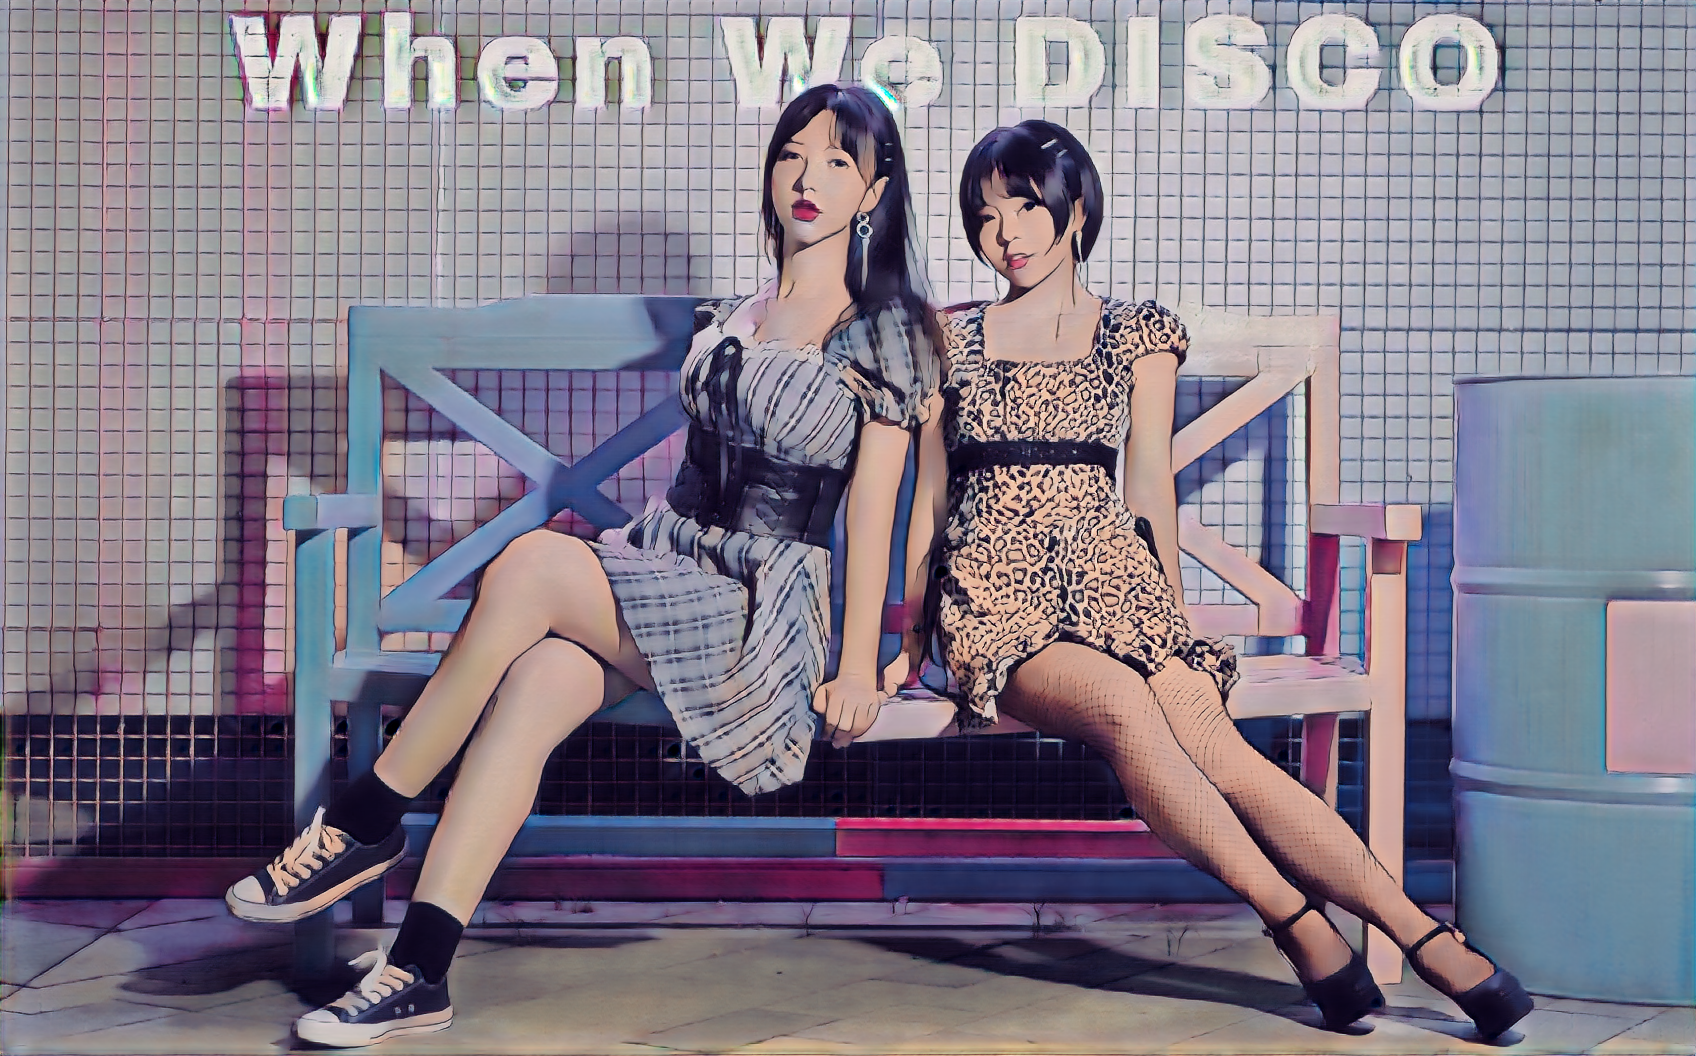
对于这一点,评论区的带火见仁见智,但是我觉得还是尽可能要改进一下的。

使用 DCT-Net

就在 B 站上投完稿之后的第二天早上我便刷到了介绍阿里达摩院modelscope的视频,视频中不担介绍了modelscope,还介绍了DCT-Net。这次这个模型宣传效果挺好。用网页版 API 试了试最起码效果比AnimeGANv3好,所以我想着把之前的缺点改进一下。

SageMaker (失败)

首先进入Amazon SageMaker Studio Lab,反手开干:

1
2
import os
import cv2
1
2
3
4
5
6
7
8
9
10
11
12
13
14
---------------------------------------------------------------------------
ImportError Traceback (most recent call last)
/tmp/ipykernel_83/2736127408.py in <module>
----> 1 import cv2
2 import os

~/.conda/envs/default/lib/python3.9/site-packages/cv2/__init__.py in <module>
6 import sys
7
----> 8 from .cv2 import *
9 from .cv2 import _registerMatType
10 from . import mat_wrapper

ImportError: libgthread-2.0.so.0: cannot open shared object file: No such file or directory

网上一搜,反手一个

1
apt-get install libglib2.0-dev
1
2
E: Could not open lock file /var/lib/dpkg/lock-frontend - open (13: Permission denied)
E: Unable to acquire the dpkg frontend lock (/var/lib/dpkg/lock-frontend), are you root?

再来:

1
sudo apt-get install libglib2.0-dev
1
bash: sudo: command not found

没救了,opencv都导入不成功了,还是改kaggle吧。

kaggle

1
2
3
4
import os
for dirname, _, filenames in os.walk('/kaggle/input'):
for filename in filenames:
print(os.path.join(dirname, filename))
1
2
3
/kaggle/input/draftmp4/whenwedisco.mp4
/kaggle/input/draftmp4/example.jpg
/kaggle/input/draftmp4/real.jpg
1
2
!mkdir -p ./mp4_img ./mp4_img3 ./output
!pip install "modelscope[cv]" -f https://modelscope.oss-cn-beijing.aliyuncs.com/releases/repo.html
1
2
3
4
5
Looking in links: https://modelscope.oss-cn-beijing.aliyuncs.com/releases/repo.html
Collecting modelscope[cv]
Downloading https://modelscope.oss-cn-beijing.aliyuncs.com/releases/v0.3/modelscope-0.3.4-py3-none-any.whl (1.0 MB)
...
缩减输出清版面
1
2
import os
import cv2
1
input_video = '../input/draftmp4/whenwedisco.mp4'
1
2
3
4
5
6
7
8
9
10
11
12
13
14
15
16
17
18
19
def transform_video_to_image(video_file_path, img_path):
'''
将视频中每一帧保存成图片
'''
video_capture = cv2.VideoCapture(video_file_path)
fps = video_capture.get(cv2.CAP_PROP_FPS)
count = 0
while(True):
ret, frame = video_capture.read()
if ret:
cv2.imwrite(img_path + '%d.jpg' % count, frame)
count += 1
else:
break
video_capture.release()
print('视频图片保存成功, 共有 %d 张' % count)
return fps,count

fps,count = transform_video_to_image(input_video, './mp4_img/')

视频图片保存成功, 共有 6832 张

1
2
3
4
5
6
7
8
9
10
11
12
13
14
import cv2
from modelscope.outputs import OutputKeys
from modelscope.pipelines import pipeline
from modelscope.utils.constant import Tasks

img_cartoon = pipeline(Tasks.image_portrait_stylization,
model='damo/cv_unet_person-image-cartoon_compound-models')
for i in range(0, count-1):
result = img_cartoon('./mp4_img/%d.jpg' % i)
cv2.imwrite('./mp4_img3/%d.jpg' % i, result[OutputKeys.OUTPUT_IMG])
if i % 100 == 0:
print('./mp4_img/%d.jpg' % i)

print('finished!')
1
2
3
4
5
6
7
8
9
10
11
12
13
14
2022-08-15 03:53:52,771 - modelscope - INFO - PyTorch version 1.11.0 Found.
2022-08-15 03:53:52,776 - modelscope - INFO - TensorFlow version 2.6.4 Found.
2022-08-15 03:53:52,777 - modelscope - INFO - Loading ast index from /root/.cache/modelscope/ast_indexer
...
缩减输出清版面
2022-08-15 03:54:42.831239: W tensorflow/core/common_runtime/bfc_allocator.cc:272] Allocator (GPU_0_bfc) ran out of memory trying to allocate 2.98GiB with freed_by_count=0. The caller indicates that this is not a failure, but may mean that there could be performance gains if more memory were available.


No face detected!
./mp4_img/0.jpg
...
缩减输出清版面
No face detected!
finished!
1
2
3
4
5
6
7
8
9
10
11
12
13
14
15
16
17
18
19
20
21
22
23
24
25
26
def combine_image_to_video(comb_path, output_file_path, fps, is_print=False):
'''
合并图像到视频
'''
fourcc = cv2.VideoWriter_fourcc(*'mp4v')

file_items = os.listdir(comb_path)
file_len = len(file_items)
# print(comb_path, file_items)
if file_len > 0 :
temp_img = cv2.imread(os.path.join(comb_path, file_items[0]))
img_height, img_width = temp_img.shape[0], temp_img.shape[1]

out = cv2.VideoWriter(output_file_path, fourcc, fps, (img_width, img_height))

for i in range(file_len):
pic_name = os.path.join(comb_path, str(i)+".jpg")
if is_print:
print(i+1,'/', file_len, ' ', pic_name)
img = cv2.imread(pic_name)
out.write(img)
out.release()


combine_image_to_video('./mp4_img3/', './output/mp4_analysis.mp4' ,fps)
print("finished!")

finished!

1
2
3
4
5
6
import time
final_name="./output/"+time.strftime("%Y%m%d%H%M%S", time.localtime())+".mp4"
tran_name="! ffmpeg -i ./mp4_analysis.mp4 -i ./output/mp4_analysis.mp3 -c copy "+final_name
! ffmpeg -i ../input/draftmp4/whenwedisco.mp4 -vn ./output/mp4_analysis.mp3
os.system(tran_name)
print("finished!")
1
2
3
4
5
6
7
8
9
10
11
12
13
14
15
16
17
18
19
20
21
22
23
24
25
26
27
28
29
30
31
32
33
34
35
36
37
38
39
40
41
42
43
44
45
46
47
48
49
50
51
52
53
54
55
56
57
58
ffmpeg version 4.2.7-0ubuntu0.1 Copyright (c) 2000-2022 the FFmpeg developers
built with gcc 9 (Ubuntu 9.4.0-1ubuntu1~20.04.1)
configuration: --prefix=/usr --extra-version=0ubuntu0.1 --toolchain=hardened --libdir=/usr/lib/x86_64-linux-gnu --incdir=/usr/include/x86_64-linux-gnu --arch=amd64 --enable-gpl --disable-stripping --enable-avresample --disable-filter=resample --enable-avisynth --enable-gnutls --enable-ladspa --enable-libaom --enable-libass --enable-libbluray --enable-libbs2b --enable-libcaca --enable-libcdio --enable-libcodec2 --enable-libflite --enable-libfontconfig --enable-libfreetype --enable-libfribidi --enable-libgme --enable-libgsm --enable-libjack --enable-libmp3lame --enable-libmysofa --enable-libopenjpeg --enable-libopenmpt --enable-libopus --enable-libpulse --enable-librsvg --enable-librubberband --enable-libshine --enable-libsnappy --enable-libsoxr --enable-libspeex --enable-libssh --enable-libtheora --enable-libtwolame --enable-libvidstab --enable-libvorbis --enable-libvpx --enable-libwavpack --enable-libwebp --enable-libx265 --enable-libxml2 --enable-libxvid --enable-libzmq --enable-libzvbi --enable-lv2 --enable-omx --enable-openal --enable-opencl --enable-opengl --enable-sdl2 --enable-libdc1394 --enable-libdrm --enable-libiec61883 --enable-nvenc --enable-chromaprint --enable-frei0r --enable-libx264 --enable-shared
libavutil 56. 31.100 / 56. 31.100
libavcodec 58. 54.100 / 58. 54.100
libavformat 58. 29.100 / 58. 29.100
libavdevice 58. 8.100 / 58. 8.100
libavfilter 7. 57.100 / 7. 57.100
libavresample 4. 0. 0 / 4. 0. 0
libswscale 5. 5.100 / 5. 5.100
libswresample 3. 5.100 / 3. 5.100
libpostproc 55. 5.100 / 55. 5.100
Input #0, mov,mp4,m4a,3gp,3g2,mj2, from '../input/draftmp4/whenwedisco.mp4':
Metadata:
major_brand : isom
minor_version : 512
compatible_brands: isomiso2avc1mp41
encoder : Lavf58.76.100
description : Bilibili VXCode Swarm Transcoder v0.7.17
Duration: 00:03:48.07, start: 0.000000, bitrate: 6469 kb/s
Stream #0:0(und): Video: h264 (High) (avc1 / 0x31637661), yuv420p(tv, bt709), 1920x1080, 6334 kb/s, 29.97 fps, 29.97 tbr, 30k tbn, 59.94 tbc (default)
Metadata:
handler_name : VideoHandler
Stream #0:1(und): Audio: aac (LC) (mp4a / 0x6134706D), 44100 Hz, stereo, fltp, 128 kb/s (default)
Metadata:
handler_name : SoundHandler
Stream mapping:
Stream #0:1 -> #0:0 (aac (native) -> mp3 (libmp3lame))
Press [q] to stop, [?] for help
Output #0, mp3, to './output/mp4_analysis.mp3':
Metadata:
major_brand : isom
minor_version : 512
compatible_brands: isomiso2avc1mp41
description : Bilibili VXCode Swarm Transcoder v0.7.17
TSSE : Lavf58.29.100
Stream #0:0(und): Audio: mp3 (libmp3lame), 44100 Hz, stereo, fltp (default)
Metadata:
handler_name : SoundHandler
encoder : Lavc58.54.100 libmp3lame
size= 3564kB time=00:03:48.07 bitrate= 128.0kbits/s speed= 29x
video:0kB audio:3564kB subtitle:0kB other streams:0kB global headers:0kB muxing overhead: 0.011508%
finished!


ffmpeg version 4.2.7-0ubuntu0.1 Copyright (c) 2000-2022 the FFmpeg developers
built with gcc 9 (Ubuntu 9.4.0-1ubuntu1~20.04.1)
configuration: --prefix=/usr --extra-version=0ubuntu0.1 --toolchain=hardened --libdir=/usr/lib/x86_64-linux-gnu --incdir=/usr/include/x86_64-linux-gnu --arch=amd64 --enable-gpl --disable-stripping --enable-avresample --disable-filter=resample --enable-avisynth --enable-gnutls --enable-ladspa --enable-libaom --enable-libass --enable-libbluray --enable-libbs2b --enable-libcaca --enable-libcdio --enable-libcodec2 --enable-libflite --enable-libfontconfig --enable-libfreetype --enable-libfribidi --enable-libgme --enable-libgsm --enable-libjack --enable-libmp3lame --enable-libmysofa --enable-libopenjpeg --enable-libopenmpt --enable-libopus --enable-libpulse --enable-librsvg --enable-librubberband --enable-libshine --enable-libsnappy --enable-libsoxr --enable-libspeex --enable-libssh --enable-libtheora --enable-libtwolame --enable-libvidstab --enable-libvorbis --enable-libvpx --enable-libwavpack --enable-libwebp --enable-libx265 --enable-libxml2 --enable-libxvid --enable-libzmq --enable-libzvbi --enable-lv2 --enable-omx --enable-openal --enable-opencl --enable-opengl --enable-sdl2 --enable-libdc1394 --enable-libdrm --enable-libiec61883 --enable-nvenc --enable-chromaprint --enable-frei0r --enable-libx264 --enable-shared
libavutil 56. 31.100 / 56. 31.100
libavcodec 58. 54.100 / 58. 54.100
libavformat 58. 29.100 / 58. 29.100
libavdevice 58. 8.100 / 58. 8.100
libavfilter 7. 57.100 / 7. 57.100
libavresample 4. 0. 0 / 4. 0. 0
libswscale 5. 5.100 / 5. 5.100
libswresample 3. 5.100 / 3. 5.100
libpostproc 55. 5.100 / 55. 5.100
./mp4_analysis.mp4: No such file or directory

导出视频我们发现视频的码率不一,没办法,只能用格式工厂把转完之后的图像一帧一帧地合成视频后再用 Pr 调速度并添加音频后发布(直接用格式工厂加音频会出错),最后终于正常了。

总结与反思

新模型是先对图片做 image segmentation 辨认人脸,再对人脸部分做 style transfer 。这样带来的问题是显而易见的:

DCT缺点

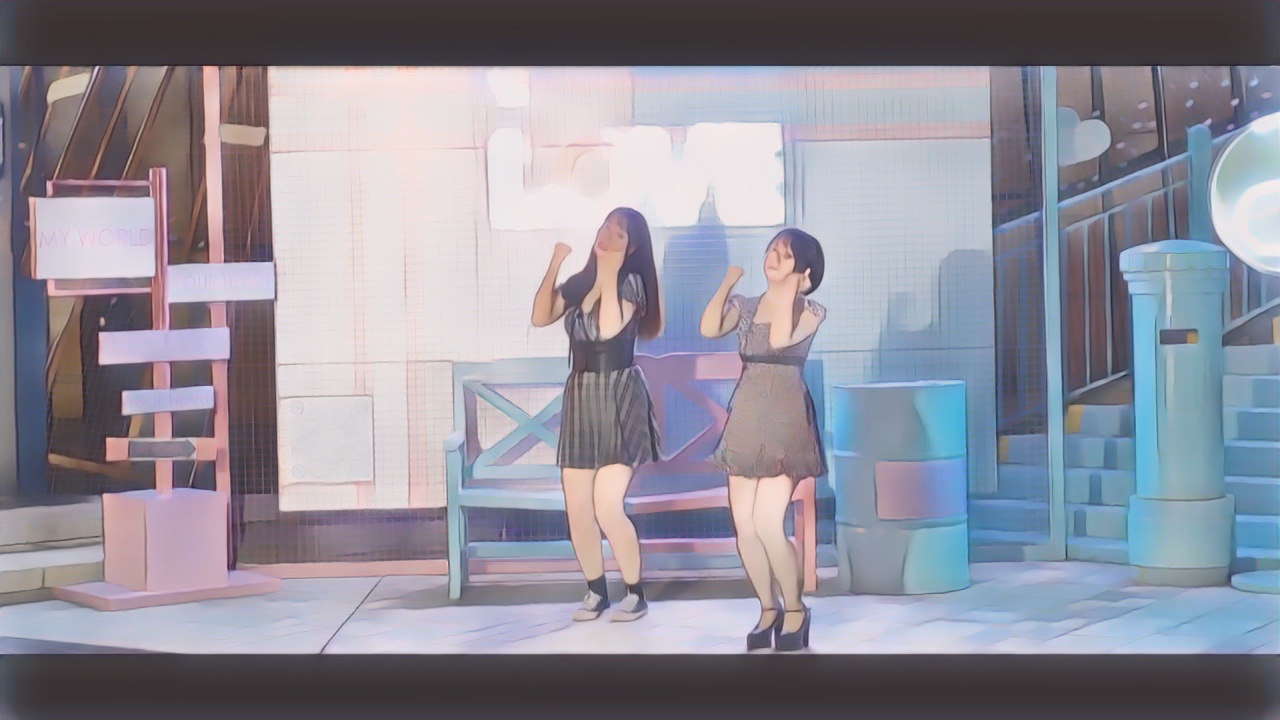
上图中,一张脸被 transfer 了而另一张脸没被 transfer。

先这样吧。后面实在不行改用 diffusion 的 generative 的 model 试试。